Example:
ESP32 Snake Game with MPU6050 (Code + Wiring + GitHub)
Introduction
In this tutorial, you’ll learn how to build a [PROJECT NAME] using an ESP32, [SENSORS/MODULES], and an OLED display.
This project is beginner-friendly and includes:
- Complete wiring guide
- Example source code
- Library installation
- Troubleshooting tips
- GitHub download
Perfect for Arduino, ESP32, and DIY electronics enthusiasts.
What You Will Build
In this project, you will build:
- [FEATURE 1]
- [FEATURE 2]
- [FEATURE 3]
Example:
- Motion-controlled snake game
- Real-time OLED graphics
- MPU6050 tilt controls
Components Required
| Component | Quantity |
|---|---|
| ESP32 Board | 1 |
| MPU6050 Sensor | 1 |
| OLED SSD1306 Display | 1 |
| Breadboard | 1 |
| Jumper Wires | Several |
Recommended Components
The following parts were used in this build:
- ESP32 Board → [Affiliate Link]
- MPU6050 Sensor → [Affiliate Link]
- OLED Display → [Affiliate Link]
- Breadboard Kit → [Affiliate Link]
These components are beginner-friendly and work reliably for most ESP32 projects.
Project Demonstration
You can also watch the full project demonstration here:
[YouTube Video Link]
Wiring Diagram
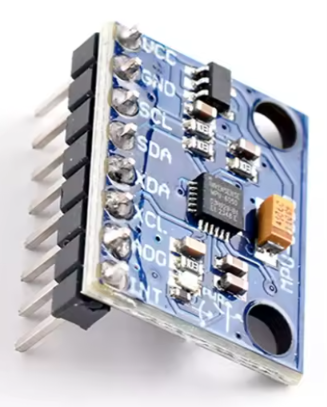
MPU6050 Connections
| MPU6050 | ESP32 |
|---|---|
| VCC | 3.3V |
| GND | GND |
| SDA | GPIO 21 |
| SCL | GPIO 22 |
OLED Display Connections
| OLED | ESP32 |
|---|---|
| VCC | 3.3V |
| GND | GND |
| SDA | GPIO 21 |
| SCL | GPIO 22 |
Installing Required Libraries
Open the Arduino IDE Library Manager and install:
- Adafruit GFX
- Adafruit SSD1306
- MPU6050 Library
Arduino / ESP32 Code
// Paste your code here
Uploading the Code
- Connect the ESP32 board to your computer
- Open Arduino IDE
- Select the correct ESP32 board
- Choose the correct COM port
- Upload the sketch
How the Project Works
The ESP32 reads sensor data from the MPU6050 using I2C communication.
The motion values are processed in real time and used to control the game displayed on the OLED screen.
This project demonstrates:
- Motion sensing
- OLED graphics
- Real-time controls
- ESP32 programming
- I2C communication
Project Running
After uploading the code, the OLED display should start showing the game interface.
Tilting the MPU6050 changes the movement direction instantly.
Troubleshooting
OLED Display Not Working
- Verify SDA and SCL wiring
- Check the display I2C address
- Confirm 3.3V power connection
MPU6050 Not Detected
- Recheck wiring connections
- Install the correct library
- Run an I2C scanner sketch
ESP32 Upload Errors
- Hold the BOOT button during upload
- Use a USB data cable
- Reinstall ESP32 board support
Project Improvements
You can improve this project by:
- Adding sound effects
- Creating multiple levels
- Saving high scores
- Using a larger display
- Adding Bluetooth support
Frequently Asked Questions
Can I use Arduino Uno instead of ESP32?
Yes, although performance may be lower depending on the project complexity.
Does this work with PlatformIO?
Yes, the code can easily be adapted for PlatformIO.
Can I use another OLED display?
Most SSD1306 I2C OLED displays should work correctly.
Related Projects
- ESP32 OLED Tutorial
- MPU6050 Beginner Guide
- Best ESP32 Projects for Beginners
- ESP32 Motion Sensor Projects
Final Result
This project is a great way to learn:
- ESP32 programming
- Motion sensing
- OLED graphics
- Embedded systems
- DIY electronics
If you enjoyed this project, check out the recommended components used in this build.
GitHub Download
Download the full source code and project files here:
[GitHub Repository Link]
Recommended Parts
Support future tutorials by checking the components used in this project:
- ESP32 Board → [Affiliate Link]
- MPU6050 Sensor → [Affiliate Link]
- OLED Display → [Affiliate Link]
Share This Project
If you built this project:
- Share your results
- Modify the code
- Add new features
- Fork the GitHub repository
- Create your own version